Because it supports Ethernet connections, the Allen-Bradley Micro820 controller may establish connections and exchange data with other devices on an Ethernet network. When setting up Ethernet connectivity with the Micro820 controller, the following are the primary considerations:
Ethernet Port:
There is an Ethernet port integrated right into the Micro820 controller. Two popular Ethernet protocols are supported: TCP/IP and UDP/IP.
The Allen-Bradley Micro820 controller can communicate across an Ethernet network thanks to a built-in Ethernet connector. Ethernet connectivity is provided by an Ethernet port, which is a physical interface on the controller.
The Ethernet port on the Micro820 controller typically supports standard Ethernet protocols including TCP/IP (Transmission Control Protocol/Internet Protocol) and UDP/IP (User Datagram Protocol/Internet Protocol). By enabling data packet transmission and receiving, it makes it possible for the controller to interact with other networked devices.
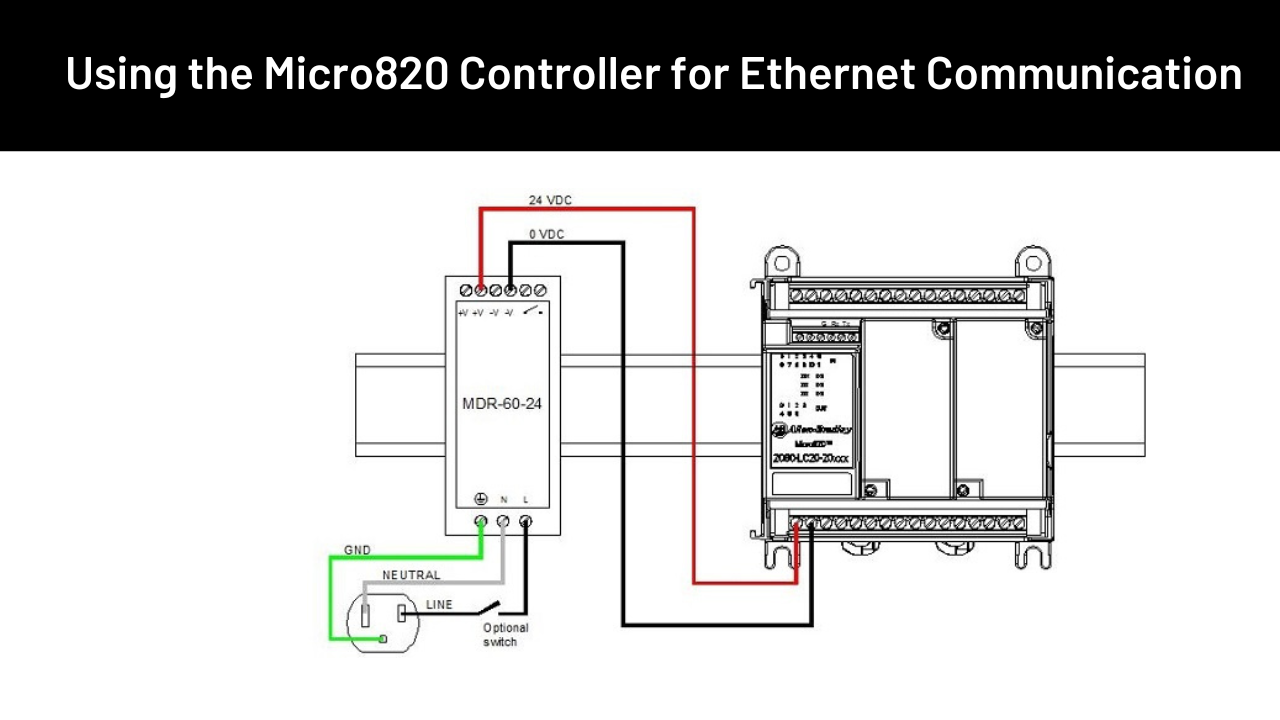
To use the Ethernet port on the Micro820 controller, you need to connect an Ethernet cable from the controller to the network switch or router.
Network Configuration:
- Before establishing an Ethernet connection, you must configure the Micro820 controller’s network settings. As part of this, the IP address, subnet mask, gateway address, and, if required, DNS (Domain Name System) must all be configured. The programming apps or the web server of the controller can be used to set these settings.
- IP Address Assignment: Assign a unique IP address to the Micro820 controller. Verify that the other connected devices’ IP address is within the same Ethernet network range. For the controller, there are two setup options: DHCP (Dynamic Host setup Protocol) and a static IP address.
- Subnet Mask: To identify the network’s subnetwork, set the subnet mask on the Micro820 controller. The subnet mask determines which portion of the IP address is used for the network address and which portion is used for the device address. This device’s subnet mask and the subnet masks used by other networked devices must match.
IP Address:
- Ascertain that the Micro820 controller is within the same network range as the other Ethernet network devices and assign it a unique IP address. Effective data exchange and communication are made possible by this.
- Static IP Address: It is possible to assign a static IP address to the Micro820 controller, ensuring that it remains fixed and unchanging throughout time. This method is commonly applied when connected devices need to establish a regular connection with the controller at a certain IP address.
- DHCP (Dynamic Host Configuration Protocol): Alternatively, you may configure the Micro820 controller to use DHCP to automatically obtain an IP address. In this case, a DHCP server on the network provides a dynamic IP address to the controller. This method works well for networks where IP addresses are managed centrally and can change over time.
Check :- Allen Bradley Micro820 Programmable Controller
Communication Protocols:
- The Micro820 controller supports several Ethernet communication protocols, including EtherNet/IP, Modbus TCP/IP, and others. Select the appropriate protocol based on the requirements of your application and the devices you intend to interface with.
- EtherNet/IP: Real-time control and data sharing between the Micro820 controller, HMIs, and other network-capable devices is possible. EtherNet/IP supports implicit messaging (I/O data transfer) as well as explicit messaging (point-to-point communication).
- Modbus TCP/IP: A popular open communication protocol in industrial automation is Modbus TCP/IP. It enables Ethernet-based device connections based on the Modbus protocol. The Micro820 controller may be used as a Modbus TCP/IP client or server, allowing data to be shared with other devices that support Modbus TCP/IP.
- Programming Software: The Ethernet communication settings of the Micro820 controller can be configured using programming software (such Connected Components Workbench). The IP address, protocol, port numbers, and other communication-related characteristics must all be specified.
- Programming Editor: The software provides an editor for programming using ladder logic that is easy to use. You may create, modify, and arrange ladder logic programmes in addition to adding function blocks and setting programme execution.
- Configuring the device’s linked components Workbench may be used to customise the Micro820 controller’s network settings, I/O configurations, timers, counters, and other controller features. Input and output tags, connection protocols, and controller behaviour can all be defined.
Device Configuration:
- Ensure that any other devices you are dealing with, such PLCs or Human Machine Interfaces (HMIs), have their network settings and communication parameters set appropriately to match the Micro820 controller.
- Hardware Configuration: The Micro820 controller is compatible with a variety of hardware modules, including I/O, expansion, and communication modules. Ensure that the hardware modules are installed in compliance with the manufacturer’s instructions and are linked to the controller. Examine the types of modules, slots, and wire connections.
- I/O Configuration: Use programming tools, such as the associated Components Workbench, to configure the input and output (I/O) modules connected to the Micro820 controller. To do this, you must list the addresses, tags, and types of I/O modules that are attached to each module. Describe the I/O point behaviour, scalability options, and data types.
Testing Communication:
- After network and communication parameters have been set, run communication tests to ensure the Micro820 controller can successfully exchange data with the target devices. This might involve observing data flow, sending and receiving test messages, or doing functional tests in order to validate the connection.
Security Considerations:
- Install the required security measures to protect the Ethernet connectivity of the Micro820 controller. This may entail deploying firewalls, VPN (Virtual Private Network) connections, or other security measures to safeguard the data’s integrity and confidentiality.
Refer to the user manual, technical documentation, and programming tools for further information on setting Ethernet connectivity with the Rockwell Automation Micro820 controller. These sources will provide instructions and advice specific to your controller firmware and software version.